CLARE HEDGES
MAKE UP ARTIST
I'm a title. Click here to edit me
I'm a paragraph. Click here to add your own text and edit me. It’s easy. Just click “Edit Text” or double click me to add your own content and make changes to the font. Feel free to drag and drop me anywhere you like on your page. I’m a great place for you to tell a story and let your users know a little more about you.
This is a great space to write long text about your company and your services. You can use this space to go into a little more detail about your company. Talk about your team and what services you provide. Tell your visitors the story of how you came up with the idea for your business and what makes you different from your competitors. Make your company stand out and show your visitors who you are.
At Wix we’re passionate about making templates that allow you to build fabulous websites and it’s all thanks to the support and feedback from users like you! Keep up to date with New Releases and what’s Coming Soon in Wixellaneous in Support. Feel free to tell us what you think and give us feedback in the Wix Forum. If you’d like to benefit from a professional designer’s touch, head to the Wix Arena and connect with one of our Wix Pro designers. Or if you need more help you can simply type your questions into the Support Forum and get instant answers. To keep up to date with everything Wix, including tips and things we think are cool, just head to the Wix Blog!
NEGATIVE AND POSITIVE MOULDS


Grounding
-
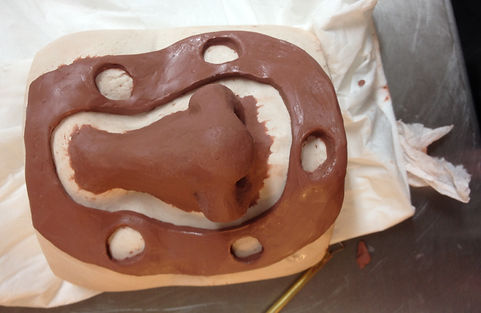
The grounding around the piece should only be approx 3mm thick. The grounding wall should follow shape of blended edge and be equidistant the whole way. The edge from piece to wall should be approx 5mm.
-
Ensure that the edge is sharp - this is called the cutting edge
-
There should be touch down points in the grounding wall - these are to ensure that it locks in the same place each time.
I created my nose and grounding using Le Beau Touche. I tried to make my grounding neat however I can see from looking at this image that it could have been neater. The grounding is also not uniform and does not follow the blended edge at an equal distant all around.
I can also see from the bottom picture that the edge of the nose is not completely blended.
I then took my sculpt in to the plaster room where I put release agent on the white areas of our mold. I then made my plaster and put it onto the plaster cast and over my nose. I made sure that there was enough height over the nose as this is the highest point. Once this had dried, I then smoothed off the mold while it was still wet to make it neat. Following that, once it was dry, I sanded the sides of the mold.
I forgot to put vaseline on my mould initially and quickly added the vaseline as an after thought. This made de-moulding much more difficult.
Once the mould was cleaned out using IPA, I vaselined the mould as well as the cast of the face. I then heated up for gelatin in the microwave for 10 seconds and then for a further 5 seconds making sure that there were no bubbles. I then poured the gelatin in to my mould and used objects to weigh it down. The edges of my gelatin nose were too thick and also tore slightly when I was taking it out of the mould. Next time I would need to add more weight while the gelatin is curing to get thinner edges.
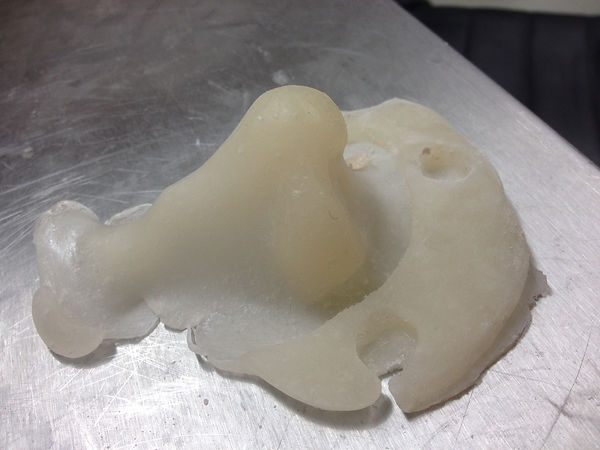
The image to the left was the gelatin result of this mold. There was a small bump in the bottom caused by an air bubble and also a small tear in the flashing on the top left side other than that I feel that the nose was succesful.
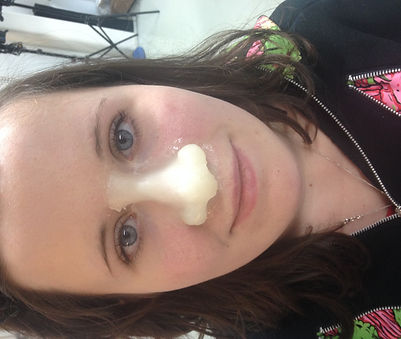
This was my attempt of applying my nose piece. The piece was too big for my model as it is a generic piece and not bespoke for this particular model. This made it hard to stick down at the top. I found that one side blended much better than the other side. This is something I will need to practice as I did not find the result all that effective the first time round. I also forgot to put sealer inside the nose so I decided not to paint it.

Julia gave us a demonastration on how to vacuum form which will be useful in the future. We then used this mold, vaselined it and filled it with plaster. Once this has set, we took it out and once fully dry we would be able to sculpt on it. We would then be able to create our negative mold.
This vacuum form can also be used to store pieces such as flat pieces and keep them in shape. It is better to use the vacuum form as it is made of plastic and is not porous, unlike a plaster cast.